Calendula growing guide

The Beginner's Guide to Growing Calendula: A Comprehensive Content Plan

The Complete Calendula Growing Guide: Tips for Vibrant Blooms

In this Calendula growing guide we are going to dive into a world where flowers paint the landscape with colors that warm your heart. 

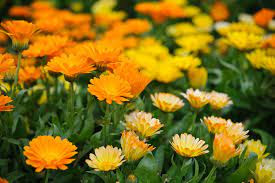
Say hello to Calendula – a name that might sound fancy, but trust me, it's a friendly flower that's all about bringing joy to your garden. 

Picture this: a burst of bright, happy petals waving at you as you stroll through your garden. 

That's the magic of Calendula. It's not just a regular flower; it's like a pocketful of sunshine, ready to share its cheerfulness with everyone it meets.

Now, why is Calendula such a big deal in gardening circles? Well, think about it – a plant that's so easygoing, even beginners can get their hands dirty and watch it thrive. But it's not just for the newbies; experienced gardeners adore it too. Why, you ask? Those vibrant blooms have a way of turning any patch of earth into a masterpiece. 

So, whether you're just starting out on your gardening journey or you've got a few seasons under your belt, Calendula is here to be your gardening sidekick. In this guide, we'll spill the beans on how to make this happy-go-lucky flower a star in your garden. Let's roll up our sleeves and get ready to let Calendula's cheerful charm transform your green space!

Choosing the Perfect Spot: Where Sunshine Works Wonders

When it comes to Calendula, picking the right spot is like choosing the best seat in the house for a fantastic show. 

These radiant blooms thrive in conditions that might make other plants jealous. Let's dive into the world of ideal Calendula growing conditions!

Sunlight: A Ray of Happiness for Calendula

Imagine Calendula as a sunbather, stretching its petals to soak up the sun's warmth. 

These flowers adore sunlight, and they're not shy about it. So, scout out a spot in your garden where the sun generously visits for about 6 to 8 hours a day. 

If you have a sunny corner that's been waiting for some love, Calendula might just be its perfect match.

Soil: Let's Talk About Drainage

Now, here's a secret Calendula is about to share: it likes its feet dry, but not too dry. Well-draining soil is the magic phrase here. This means Calendula prefers soil that doesn't hold onto water like a sponge, ensuring its roots stay comfy and cozy. If your garden soil tends to be a bit clingy, no worries! You can improve drainage by mixing in some organic matter like compost.

Prepping the Soil: A Treat for the Roots

Before you introduce Calendula to its new home, show your soil some love. First, clear away any weeds, rocks, or debris. Then, loosen the soil to give those roots a chance to stretch and explore. Adding a bit of compost not only improves drainage but also gives your Calendula a gentle nutrient boost. Think of it as setting the table for a grand feast!

Containers: Big Dreams, Small Spaces

Hold on, urban gardeners and balcony enthusiasts – Calendula has a treat for you too! Containers are a match made in gardening heaven for Calendula. They offer flexibility, especially if you're short on garden space. You can have your Calendula garden right on your windowsill or balcony. Just ensure the container has drainage holes so excess water doesn't cramp your Calendula's style.

Calendula, the Urban Gardener's BFF

Living in the city doesn't mean you can't have a garden full of blooming happiness. Calendula understands urban living, and it's more than ready to make itself at home in your containers. So, if you've got a little space with a view, don't hesitate to welcome Calendula's sunny disposition.

In the world of Calendula, location matters – it's like finding the perfect dance floor for a celebration. Give your Calendula the spotlight it deserves by offering it the right balance of sunlight, well-draining soil, and maybe even a cozy container. Now that we've found the perfect spot, it's time to roll up our sleeves and get planting!

Planting Calendula: Where Blooms Begin

Now that you've found the perfect spot for your Calendula adventure, it's time to roll up your sleeves and get those hands dirty. Planting Calendula is like starting a new chapter in your garden story, and we're here to guide you every step of the way.

Timing: Seize the Spring

Calendula knows how to make an entrance, and it prefers to do so in early spring. After the last frost has bid adieu and the days are warming up, that's your cue to plant these cheerful blossoms. The soil is waking up from its winter slumber, and Calendula is ready to join the party.

Seeds or Transplants: The Choice is Yours

Now, you have a choice to make: seeds or transplants? Seeds are like tiny promises of beauty waiting to bloom, while transplants are like guests who arrive fashionably early to the garden party. If you're going the seed route, scatter them gently on the soil surface and lightly cover them with a thin layer of soil. Water them like you're giving them a warm welcome.

Transplants, on the other hand, are like instant friends. Dig a hole in your prepared soil, carefully remove the transplant from its container, and place it in the hole. Pat the soil around it, giving it a gentle hug, and water it to help it settle in. Whichever way you choose, Calendula is excited to be a part of your garden tale.

Giving Them Space: It's All About Breathing Room

Calendula likes its personal space – don't we all? When planting, make sure you give each Calendula plant some room to stretch its petals. Space them about 6 to 12 inches apart. This isn't just about keeping the peace; it's also about promoting proper airflow. Good airflow means happy, healthy plants less likely to encounter issues like disease.

Growing Together: A Blooming Symphony

Now that your Calendula plants are nestled in the soil, it's like a symphony has started playing in your garden. The plants will grow and bloom together, creating a harmonious melody of color and fragrance. As they stretch towards the sun and spread their petals wide, you'll see your Calendula garden transform into a masterpiece.

In the world of Calendula, planting is the enchanting beginning of a story that unfolds with every bloom. As you plant these seeds of joy or welcome transplants with open arms, remember that you're nurturing a connection to nature and the promise of vibrant blossoms ahead. So, take a step back, admire your work, and get ready for the magic that's about to unfold in your garden.

Nurturing Calendula: A Garden's Heartfelt Care

Just like any growing relationship, caring for your Calendula requires attention, understanding, and a dash of TLC. 

These radiant blooms have their preferences, and by tending to their needs, you're ensuring a garden filled with vibrant joy.

Watering Wisely: A Quenching Routine

Calendula might not whisper their hydration needs, but their growth sure tells a story. These beauties prefer a consistent moisture level, akin to the perfect balance between hydration and sunbathing. 

Water deeply but avoid flooding their roots. Aim for the soil to be damp but not waterlogged – soggy feet aren't Calendula's style!


Mulching Magic: A Blanket of Love

Imagine your garden as a cozy bed, and mulch as the soft blanket that keeps it snug. Mulching around your Calendula plants serves multiple purposes. It retains moisture in the soil, preventing it from evaporating under the sun's rays. Plus, it acts as a barrier against pesky weeds trying to sneak into your Calendula's space. It's like a little garden hug that keeps everything in balance.

Feeding for Flourishing: A Balanced Meal

Just like we need our three square meals a day, Calendula appreciates its own balanced diet. Think of fertilizing as treating your plants to a delicious garden feast. Grab an all-purpose fertilizer and follow the instructions on the label. Giving your Calendula this nutrient boost encourages healthy growth and blooms that dazzle.

A Word on Timing: Feeding Right

Timing is key, my gardening friends. Start fertilizing when your Calendula starts to show its first leaves. As they grow and prepare to bloom, you can offer them a second helping. However, remember that overfeeding is like indulging in too many sweets – moderation is the golden rule.

Caring for Calendula isn't just about routine; it's about building a connection with nature. As you water, mulch, and feed your plants, you're fostering an environment where beauty can flourish and your garden can thrive. Your Calendula will reward you with blossoms that reflect your dedicated care, turning your garden into a canvas of happiness.

In the grand garden of life, nurturing Calendula is like tending to a delicate treasure. Each drop of water, each layer of mulch, and each dose of fertilizer adds up to a symphony of growth that you're conducting with love and dedication. So, as you care for your Calendula, know that you're not just growing plants; you're growing a connection to the wonders of nature.

Guarding Your Garden: Defending Calendula Against Pests and Diseases

In the garden's dance of life, pests and diseases occasionally show up uninvited. 

But fear not, dear gardener, for you're armed with knowledge and nature's solutions to protect your precious Calendula. 

Let's delve into the world of guarding your blooms against those tiny adversaries.

Pest Party Crashers: Know Your Invaders

Picture this: your Calendula garden is a happening party, and here come the uninvited guests – pests. Aphids and caterpillars might sneak in, nibbling on your Calendula's leaves like they're at an all-you-can-eat buffet. These pests may be small, but their appetites are huge. It's a good thing you're ready to show them the exit!

Nature's Helpers: Beneficial Insects to the Rescue

In nature's garden, there's a cavalry of heroes waiting to save the day – beneficial insects. Ladybugs and lacewings are like the guardians of your Calendula haven. Introduce these tiny allies, and they'll feast on the pests, keeping them in check without any harmful chemicals. It's like inviting the good guys to your garden party!

A Gentle Approach: Organic Pest Control

When it comes to pest control, think gentle, not aggressive. Soap sprays made from mild dish soap and water can work wonders. Simply spray the mixture on the pests, and they'll have no choice but to bid adieu. Neem oil, a natural plant extract, is another excellent option. Just remember to apply these solutions in the early morning or late afternoon to avoid harming beneficial insects.

Fending off Fungi: Powdery Mildew Concerns

Ah, powdery mildew – the unwelcome guest that shows up when humidity is high and air circulation is poor. This white, powdery coating can make your Calendula look less than its best. But don't fret! Prune away affected leaves, and make sure your Calendula has plenty of space for air to circulate. Water at the base of the plant to prevent wet leaves, and avoid overhead watering.

Prevention: The Best Defense

They say prevention is better than cure, and that rings true in the garden too. Keep your Calendula happy by giving them the right amount of space and sunlight. Regularly inspect your plants for any signs of trouble, catching issues before they spread. Healthy plants are less likely to fall victim to pests and diseases, so keep their environment in tip-top shape.

In the world of gardening, you're not just a caretaker; you're a protector of a delicate ecosystem. As you defend your Calendula against pests and diseases, you're ensuring that your garden thrives in harmony. With a combination of natural solutions, beneficial insects, and vigilant care, you're creating a haven where Calendula can flourish and dazzle with its vibrant beauty.

Nurturing Blooms: Pruning and Reviving Calendula's Beauty

Just as we need a haircut to keep our hair healthy and looking fabulous, your Calendula blooms benefit from a little grooming too. 

Pruning and deadheading might sound fancy, but they're like a spa day for your plants, rejuvenating them and keeping them at their best. Let's dive into the art of caring for your Calendula's blossoms.

The Beauty of Deadheading: Blossoms Renewed

Imagine your Calendula plants as performers on a stage, putting on a show with their vibrant flowers. 

After their grand performance, the blooms start to fade – that's where deadheading comes in. Deadheading is like applause for their hard work, encouraging them to produce even more flowers. It's a win-win: your garden looks stunning, and your Calendula gets an encore.

Deadheading How-To: A Gentle Touch

Deadheading might sound like something out of a gardening manual, but it's a breeze once you get the hang of it. Locate the spent flower – the one that's looking a bit tired. Follow the stem down to where it meets another set of leaves or stems. Using clean pruning shears or scissors, make a snip just above this junction. You're removing the faded flower without damaging the healthy growth below.

Promoting New Growth: The Magic of Pruning

Pruning goes beyond removing spent flowers; it's about shaping and encouraging growth. When your Calendula starts to show a bit of wildness, a gentle trim can do wonders. As a general rule, trim back about a third of the plant's height. Focus on removing straggly or dead branches, giving your Calendula a neat and tidy appearance.

Pruning Tip: Timing Matters

Timing is everything when it comes to pruning. Aim to prune your Calendula after its major blooming period. For most varieties, this is around midsummer. By then, the initial burst of blooms has wowed your garden, and your Calendula is ready for a touch-up. Keep in mind that a little pruning goes a long way – don't go overboard and leave your plants feeling naked!

A Garden's Symphony: The Reward of Care

In the garden's symphony of growth and beauty, pruning and deadheading play their harmonious notes. As you give your Calendula plants a bit of attention, you're not just maintaining their appearance – you're telling them that their efforts are noticed and cherished. Your garden transforms into a canvas of blossoms, each petal a testament to your nurturing touch.

So, grab your gardening gloves and a pair of shears, and step into the role of a gentle conductor. With each careful snip, you're guiding your Calendula towards a crescendo of vibrant blooms and healthy growth. As you prune and deadhead, you're not just tending to your garden; you're nurturing a connection between you and the natural world, where beauty thrives and life blossoms anew.

Harvesting Sunshine: A Bounty of Calendula's Gifts

As your Calendula garden flourishes, the time comes to reap the rewards of your nurturing efforts. Harvesting Calendula is like collecting rays of sunshine to store for later. These vibrant blooms hold the promise of culinary delights and medicinal wonders. Let's embark on the journey of harvesting and preserving Calendula's golden beauty.

Timing: When Beauty is at Its Peak

Imagine your Calendula plants as performers on a stage, each flower ready to take a bow. The best time to harvest Calendula is in the morning when the dew has evaporated but the sun isn't too harsh. Choose blossoms that are fully open and at their peak beauty. These are the moments when Calendula's colors and fragrance are most intense, ready to grace your culinary creations and herbal concoctions.

Harvesting for Culinary and Medicinal Use: The Versatile Blossoms

Calendula isn't just a pretty face; it's a multi-talented flower with a range of uses. 

For culinary endeavors, harvest the petals to add a touch of vibrant color to salads, soups, or desserts. These petals are like edible art, elevating your dishes with a hint of sunshine.

Medicinally, Calendula has been cherished for its healing properties for centuries. 

Harvest the flower heads, including the petals and the center, to create soothing salves, oils, or infusions. Calendula's gentle touch can bring comfort to irritated skin or provide a dose of wellness in your herbal teas.

Harvesting How-To: Gentle Hands

When you're ready to harvest, approach your Calendula garden with gentle hands. Hold the stem just below the flower head and gently twist or snip it off. Take care not to damage the surrounding leaves or other blooms. Harvest only what you intend to use immediately, ensuring that your Calendula's gifts stay fresh and vibrant.

Drying and Storing: Capturing Calendula's Essence

To preserve Calendula's beauty for months to come, drying is the key. Spread the harvested flowers in a single layer on a clean, dry surface. Allow them to air dry in a cool, dark place, away from direct sunlight. Once the flowers are completely dry – they should feel crispy to the touch – store them in an airtight container.

A Garden's Bounty: Nature's Gifts in Your Hands

In the tapestry of gardening, harvesting Calendula is like carefully plucking threads of sunshine. Each blossom holds the promise of culinary adventures and herbal wellness, a testament to the wonders nature provides. As you collect these golden petals and preserve them with care, you're creating a treasury of nature's gifts, ready to enrich your culinary creations and nurturing rituals.

So, with your basket in hand and a heart full of gratitude, step into your Calendula garden and embrace the act of harvesting. It's not just about collecting flowers; it's about honoring the cycle of growth, connecting with the earth's abundance, and carrying the beauty of the garden into your kitchen and your daily life.

Unlocking Calendula's Creativity: From Garden to Kitchen to Craft

Your garden is a canvas, and Calendula is the artist's palette, ready to paint your world with its vibrant hues. 

But wait, Calendula's talents extend far beyond the garden bed. 

Prepare to be amazed by its versatility as we explore the creative ways you can infuse Calendula's sunshine into every corner of your life.

A Blossom's Many Roles: Calendula's Versatility Unveiled

Calendula isn't just a pretty face – it's a multi-talented star in the world of herbs. Let's dive into the magical realm of Calendula's creativity, where its blooms shine in various applications. From soothing teas to DIY skincare and even culinary masterpieces, Calendula is ready to inspire your senses.

Herbal Teas: Sip Your Way to Wellness

Imagine holding a warm cup of herbal tea, the aroma wafting around you like a gentle embrace. Calendula's petals, when dried, transform into a delicate addition to your tea collection. Brewing a cup of Calendula tea offers more than just a delightful flavor; it's a sip of wellness. Calendula is believed to have soothing properties that can calm the senses and bring a touch of sunshine to your day.

Healing Salves and Soothing Skincare

Calendula's gifts extend beyond the teacup – they reach out to heal and rejuvenate your skin. Crafting your own Calendula-infused salves, oils, or balms is like bottling the sun's nurturing touch. Calendula's natural properties are gentle yet effective, making it a perfect ingredient for treating minor skin irritations or adding a touch of radiance to your daily skincare routine.

Edible Art: Calendula in the Kitchen

Who said art is limited to canvas? Calendula petals are like edible paintbrush strokes that transform your culinary creations into masterpieces. Sprinkle the petals over salads, soups, or desserts, and watch as your dishes come to life with a burst of color and a hint of subtle flavor. It's like garnishing your meals with a dash of joy.

Recipes and DIY: Calendula's Inspiration

Get ready to roll up your sleeves and infuse Calendula into your creative pursuits. How about whipping up a batch of Calendula-infused oil to use in cooking or as a skincare ingredient? Or try your hand at crafting Calendula-infused candles, adding a touch of natural beauty to your home decor.

Understanding Calendula's Roots: A Glimpse into History

Before we embrace the creative potential of Calendula, let's dive into its origin and history. Calendula, also known as "pot marigold," has been cherished for centuries. Its name is derived from the Latin "calendae," meaning "little calendar," as it blooms nearly every month. Don't mistake it for the true marigold (Tagetes), though; Calendula belongs to a different botanical family.

Species and Varieties: A Garden of Possibilities

Calendula boasts a diverse family, with various species and varieties that offer a range of colors, sizes, and growth habits. From the cheerful 'Pacific Beauty' with its mix of warm hues to the charming 'Lemon Twist' with its lemony petals, your Calendula garden can reflect your unique style and preferences.

From Garden to Imagination: Calendula's Story Unfolds

As you nurture your Calendula garden, you're cultivating a story that extends far beyond the soil. With each bloom, you're inviting a world of creativity into your life. From teas that comfort your soul to skincare that pampers, and from culinary artistry to DIY wonders, Calendula's versatile nature empowers you to explore, create, and make every moment a masterpiece.

Here's a list of some of the key medicinal properties associated with Calendula:

Calendula (Calendula officinalis) possesses a range of medicinal properties that have been valued for their potential therapeutic benefits. 

1. Anti-Inflammatory: Calendula contains compounds that can help reduce inflammation, making it useful for soothing irritated skin and calming inflammatory conditions.

2. Antimicrobial: The flower's properties can help combat bacteria, fungi, and other microbes, making it beneficial for addressing minor skin infections and promoting wound healing.

3. Antioxidant: Calendula's antioxidants help protect cells from oxidative stress, contributing to skin health and overall well-being.

4. Wound Healing: Calendula's ability to encourage tissue regeneration and promote collagen production can accelerate the healing process for wounds, cuts, and minor burns.

5. Skin Soothing: It's known to soothe skin irritations, redness, and itching, making it a popular ingredient in skincare products.

6. Emollient: Calendula-infused oils and creams can provide moisturization to dry, sensitive, or chapped skin.

7. Astringent: Calendula's astringent properties can help tighten and tone the skin, potentially reducing the appearance of pores.

8. Immune Support: Some compounds in Calendula may support the immune system's response to challenges and stressors.

9. Digestive Aid: Calendula has been used traditionally to support digestive health and address gastrointestinal discomfort.

10. Anti-Spasmodic: It's believed to have muscle-relaxing properties that could help ease muscle spasms or cramps.

11. Mild Diuretic: Calendula may help promote healthy fluid balance and support kidney function.

12. Antiviral: While not a strong antiviral, Calendula's compounds might offer some protection against certain viruses.

13. Anti-Tumor: Some research suggests that Calendula might have anti-tumor effects, but further studies are needed to fully understand this potential.

14. Circulatory Support: Calendula's potential to improve blood circulation can contribute to skin health and wound healing.

Remember, while Calendula has a long history of traditional use and many potential benefits, it's important to consult with a healthcare professional before using it as a remedy, especially if you have existing health conditions or are taking medications. Additionally, be cautious if you have allergies to plants in the Asteraceae family, as Calendula belongs to this botanical group.

The video below is brought to you by Lovely Greens 

Valerian Growing guide for Beginners

The Beginner's Guide to Growing Valerian: A Comprehensive Content Plan

Introducing Valerian: Exploring its Medicinal Calm

Valerian (Valeriana officinalis) stands as a medicinal herb renowned for its remarkable calming properties. 

Throughout history, this herb has been a staple in herbal remedies, offering a range of benefits for those seeking natural tranquility and well-being.

Historical Use and Benefits of Valerian in Herbal Remedies

Valerian's usage in herbal remedies dates back centuries, with its roots deeply entwined in traditional practices. Ancient civilizations recognized its potential to promote relaxation and ease stress. 

Valerian was often employed to soothe restlessness and promote better sleep, making it a cherished natural remedy for those seeking solace in the midst of life's challenges. As the years have passed, modern herbalists and researchers continue to explore the extensive advantages of Valerian, affirming its place as a revered herbal remedy.

Understanding Valerian: The Perennial Calming Flower

Valerian (Valeriana officinalis) is a captivating perennial flowering plant known for its therapeutic properties. Native to Europe and Asia, this herb has earned recognition for its ability to induce tranquility and promote a sense of well-being. Valerian's unique attributes make it a standout in the world of herbal medicine.

Characteristics, Growth Habits, and Medicinal Properties of Valerian

Valerian showcases delicate clusters of sweet-scented flowers and fern-like leaves. Its graceful appearance adds a touch of elegance to gardens and landscapes. Thriving in moist, temperate climates, Valerian is often found in damp meadows, along riverbanks, and in woodland areas. The plant reaches heights of up to five feet, featuring sturdy stems adorned with pink or white blossoms.

Medicinally, Valerian is valued for its potential to ease tension and soothe nerves. It contains compounds that interact with gamma-aminobutyric acid (GABA) receptors in the brain, leading to a calming effect. This physiological response is why Valerian has been a go-to herb for those seeking natural remedies to manage stress and anxiety.

Calming and Sleep-Inducing Effects of Valerian

Among Valerian's most notable attributes are its calming and sleep-inducing effects. For those struggling with sleeplessness or restlessness, Valerian offers a gentle solution. By promoting relaxation and supporting a sense of tranquility, it can pave the way for a restful night's sleep. This has made Valerian a popular choice for individuals seeking an alternative to traditional sleep aids.

Valerian's calming effects extend beyond sleep. When faced with moments of unease or stress, partaking in Valerian preparations, such as teas or tinctures, may provide relief. Its ability to help the mind unwind has led many to turn to Valerian during times of emotional strain, embracing its soothing properties.

Valerian (Valeriana officinalis) is a captivating perennial flowering plant cherished for its calming properties. From its historical use in herbal remedies to its modern recognition as a natural solution for relaxation and sleep support, Valerian stands as a testament to the healing power of nature. As we explore its unique characteristics, growth habits, and medicinal benefits, we gain a deeper appreciation for this herb's ability to bring tranquility and balance to our lives.

Selecting the Right Growing Conditions for Valerian: Creating a Calm Habitat

Cultivating Valerian (Valeriana officinalis) to its fullest potential requires careful consideration of its preferred growing conditions. 

This perennial herb, renowned for its calming properties, flourishes when provided with the ideal climate, sunlight, soil, and moisture levels.

Ideal Climate and Environmental Conditions:

Valerian thrives in temperate climates, favoring regions with cooler temperatures and moderate humidity. It's important to note that Valerian may not fare well in extremely hot or dry environments. 

As a lover of moist habitats, it's often found along riverbanks and in woodland areas, attesting to its preference for environments with consistent moisture levels.

Importance of Sunlight, Soil Type, and Moisture:

Sunlight: Valerian benefits from partial shade to full sun exposure. While it can tolerate a range of light conditions, providing it with some shade during the hottest parts of the day can help prevent stress and ensure healthy growth.

Soil Type: Well-draining soil with good moisture retention is essential for Valerian. It prefers fertile, loamy soil that allows water to permeate while preventing waterlogging. Amending heavy soils with compost or organic matter can improve drainage and create an optimal environment for root development.

Moisture: Consistent moisture levels are crucial for Valerian's well-being. While it appreciates moist soil, it's important to strike a balance—avoid waterlogged conditions, which can lead to root rot. Providing a consistent supply of water helps Valerian maintain its lush appearance and medicinal potency.

Tips for Selecting the Right Location and Preparing the Soil:

Location: Choose a location that offers partial shade to full sun, considering the specific light conditions of your region. If you live in a warmer climate, providing Valerian with afternoon shade can help protect it from excessive heat.

Soil Preparation: Prepare the planting area by loosening the soil to a depth of around 12 inches. Incorporate organic matter, such as compost, to improve soil structure and nutrient content. This will create a hospitable environment for Valerian's roots.

Planting: Plant Valerian in well-draining soil, ensuring that the crown of the plant is level with the soil surface. If you're growing Valerian from seeds, lightly press them into the soil and keep the area consistently moist until germination occurs.

Spacing: Provide enough space between Valerian plants to allow air circulation and prevent overcrowding. A spacing of about 18 to 24 inches between plants is generally recommended.

Mulching: Apply a layer of organic mulch around the base of the plants to help retain soil moisture, regulate temperature, and prevent weed growth.

By understanding Valerian's preferences for climate, sunlight, soil type, and moisture, you can create a nurturing environment that fosters its growth and medicinal potential. With careful selection of location, thoughtful soil preparation, and attentive watering practices, you can cultivate Valerian that flourishes, providing you with a source of natural tranquility and well-being.

Propagation and Planting Valerian: Cultivating Calming Beauty

Growing Valerian (Valeriana officinalis) involves understanding effective propagation methods and proper planting techniques. 

Whether you're starting from seeds or root divisions, the key lies in following the right steps to ensure the healthy growth of this soothing herb.

Different Methods of Propagating Valerian: Seeds and Root Divisions

Seeds: Propagating Valerian from seeds is a common method. Collect mature seeds from existing plants or acquire them from reputable sources. 

Valerian seeds have a short shelf life, so it's best to sow them as soon as possible.

Root Divisions: Valerian can also be propagated through root divisions. This method involves separating and replanting sections of established plants to create new ones. It's a way to expand your Valerian garden while maintaining the qualities of the parent plant.

Step-by-Step Instructions for Sowing Valerian Seeds:

Preparation: Fill seed trays or pots with a well-draining potting mix. Moisten the soil before sowing the seeds.

Sowing: Sprinkle the Valerian seeds evenly over the soil surface. Press them gently into the soil, but avoid burying them too deeply.

Light Covering: Sprinkle a thin layer of soil or vermiculite over the seeds to lightly cover them.

Misting: Mist the soil surface with water to provide moisture without disturbing the seeds.

Covering: Place a plastic dome or plastic wrap over the seed tray to create a humid environment. This aids germination.

Germination: Valerian seeds typically germinate within 2-3 weeks. Once the seedlings have developed a few sets of true leaves, they can be transplanted into individual pots.

Step-by-Step Instructions for Dividing Valerian Roots:

Choosing the Plant: Select a mature Valerian plant with several years of growth. Ideally, perform root divisions in early spring before new growth begins.

Digging: Gently dig around the base of the plant to expose the root system. Carefully lift the plant from the ground.

Division: Using clean gardening tools, separate the root mass into sections. Each section should have healthy roots and viable growing points.

Trimming: Trim any damaged or overly long roots to encourage healthy growth.

Replanting: Choose a suitable location for each divided section. Dig holes and place the sections in the ground, ensuring that the crown is level with the soil surface.

Watering: Water the newly divided plants thoroughly to help them establish in their new spots.

Guidance on Proper Spacing and Planting Techniques:

Spacing: Provide enough space between Valerian plants to allow air circulation and accommodate their growth. A spacing of about 18 to 24 inches between plants is generally recommended.

Soil Preparation: Before planting, amend the soil with compost or organic matter to improve drainage and nutrient content.

Planting Depth: When planting Valerian, ensure that the crown of the plant is level with the soil surface. Planting too deep can lead to rot.

Watering: Keep the soil consistently moist but not waterlogged, especially during the initial growth phase.

Mulching: Apply a layer of mulch around the base of the plants to retain moisture and regulate temperature.

By choosing the right propagation method, whether seeds or root divisions, and following proper planting techniques, you can successfully cultivate Valerian that flourishes with its calming beauty. With thoughtful spacing, well-prepared soil, and attentive care, your Valerian plants will thrive and provide you with a source of natural tranquility and well-being.

Growing Valerian in Containers: A Portable Haven of Calm

While Valerian (Valeriana officinalis) is often associated with garden beds, it can also thrive when cultivated in containers or pots. 

Whether you have limited outdoor space or simply prefer the flexibility of container gardening, growing Valerian in containers offers a convenient way to enjoy its calming properties.

Benefits of Growing Valerian in Containers:

Space Flexibility: Container gardening allows you to cultivate Valerian even if you lack a garden bed. Balconies, patios, and windowsills become potential spaces for nurturing this herb.

Soil Control: Using a well-draining potting mix tailored to Valerian's needs ensures optimal soil conditions, promoting healthy growth.

Mobility: Containers offer the advantage of mobility. You can move your Valerian pots to adjust for sunlight, shade, or changing weather conditions.

Pest Management: Elevated containers can help deter some pests and prevent soil-borne diseases that may affect plants grown directly in garden soil.

Growing Valerian in Containers:

Choosing a Container: Select a container that is at least 12-18 inches deep and wide. Ensure it has drainage holes to prevent waterlogging.

Potting Mix: Use a high-quality, well-draining potting mix that contains organic matter. Valerian prefers fertile soil that retains moisture without becoming soggy.

Planting: Place Valerian seeds or transplants into the container. If using seeds, sow them according to the instructions mentioned earlier. If using transplants, gently remove them from their nursery pots and position them at the same soil level as they were in the pots.

Spacing: If planting multiple Valerian plants in one container, space them at least 18-24 inches apart to allow for proper growth.

Sunlight: Valerian thrives in partial shade to full sun. Place the container in a location that receives at least 4-6 hours of sunlight per day. If you live in a hot climate, consider providing afternoon shade to prevent heat stress.

Watering: Keep the soil consistently moist but not waterlogged. Containers tend to dry out more quickly than garden beds, so monitor soil moisture regularly and adjust your watering schedule accordingly.

Fertilization: Valerian benefits from occasional feeding with a balanced liquid fertilizer. Follow the manufacturer's recommendations for application frequency and dosage.

Support: As Valerian grows, it may become top-heavy. Consider providing support such as stakes or a trellis to prevent the plant from becoming unstable.

Pruning: Regularly prune the plant by snipping off spent flowers and any leggy growth. This encourages compact and healthy growth.

Harvesting and Utilizing: Follow the guidelines for harvesting and utilizing Valerian mentioned earlier. Container-grown Valerian can provide you with the same soothing benefits as garden-grown plants.

Overwintering: In colder climates, consider bringing your Valerian container indoors before the first frost. Place it in a cool and well-lit location, such as a sunny window. This will allow your Valerian to continue thriving during the winter months.

Final Thoughts on Growing Valerian in containers:

Growing Valerian in containers is a convenient and rewarding way to cultivate this calming herb. With proper care, attention to sunlight, soil, and watering, you can create a portable haven of calm that provides you with the soothing effects of Valerian right at your doorstep.

Utilizing Valerian: Harnessing Nature's Calming Elixir

Valerian (Valeriana officinalis) is a herbal gem treasured for its calming properties, making it a sought-after remedy for sleep support and anxiety relief. 

To fully harness its potential, one must master the art of harvesting, drying, and utilizing Valerian's roots and aerial parts.

Optimal Timing and Techniques for Harvesting Valerian Roots and Aerial Parts

Harvesting Valerian requires careful consideration of timing and techniques to ensure maximum potency. Both the roots and aerial parts of the plant hold therapeutic value.

Root Harvesting: The optimal time to harvest Valerian roots is in the fall or early spring. During these periods, the plant's energy has shifted downward into its roots, enhancing their medicinal properties. 

Gently dig around the base of the plant, exposing the roots. Carefully lift the plant and shake off excess soil. Using clean gardening tools, trim the roots from the plant, leaving a portion in the ground for regrowth.

Aerial Part Harvesting: The aerial parts of Valerian, including the leaves and flowers, can be harvested during the plant's flowering period in late spring or early summer. Choose a dry morning when the dew has evaporated for optimal results. Use sharp scissors or pruning shears to snip the stems just above a set of leaves.

Instructions on Properly Drying and Storing Valerian

Drying Valerian properly is essential to preserve its therapeutic properties and extend its shelf life. Here's how to do it right:

Root Drying: Clean the harvested roots by gently brushing off excess dirt. Cut the roots into smaller pieces to aid drying. Lay them in a single layer on a clean, dry surface, such as a drying rack or a screen. Allow them to air dry in a well-ventilated area away from direct sunlight. Turn the roots occasionally to ensure even drying. This process can take several weeks.

Aerial Part Drying: Tie small bundles of Valerian leaves and flowers together with string or twine. Hang these bundles upside down in a dry, shaded area with good air circulation. Once completely dry, gently remove the leaves and flowers from the stems.

Different Applications of Valerian in Herbal Remedies and Teas

Valerian's versatile applications in herbal remedies have been appreciated for centuries, and its calming effects are the cornerstone of its use:

Sleep Support: Valerian's sedative properties make it an excellent aid for those seeking better sleep quality. Its compounds interact with GABA receptors in the brain, promoting relaxation and potentially reducing the time it takes to fall asleep. Herbalists often recommend Valerian as an alternative to traditional sleep aids.

Anxiety Relief: Valerian's calming effects extend to anxiety relief. By soothing nervous tension and reducing restlessness, Valerian can be a natural ally for managing feelings of anxiety. It's often included in herbal blends designed to alleviate stress.

Creating Valerian Teas for Sleep and Anxiety Relief:

Valerian Sleep Tea: To create a Valerian sleep tea, combine dried Valerian roots with other calming herbs like chamomile, lavender, and lemon balm. Steep a teaspoon of this blend in hot water for about 10-15 minutes before bedtime.

Valerian Anxiety Relief Tea: Mix dried Valerian aerial parts with soothing herbs like passionflower and skullcap. Steep a tablespoon of this blend in hot water for 15 minutes. Sip this tea during moments of heightened stress or anxiety.

Valerian's potential as a calming elixir is boundless, from its roots to its aerial parts. By mastering the art of harvesting, drying, and utilizing Valerian, you can unlock the full extent of its soothing properties. 

Whether as an aid for sleep or a balm for anxiety, Valerian stands as a testament to nature's ability to provide comfort and balance.

Utilizing Valerian's Healing Touch: Beyond Calming

Valerian (Valeriana officinalis) goes beyond its renowned calming properties to offer a range of additional medicinal uses, making it a versatile herbal ally. From its role in pain relief to its impact on digestive health, Valerian's healing touch extends to various areas of well-being.

Other Medicinal Uses for Valerian:

Pain Relief: Valerian's muscle-relaxing qualities make it a potential remedy for pain relief. 

Its ability to soothe tension in the muscles can be beneficial for individuals experiencing muscular pain or discomfort. 

Valerian's impact on the central nervous system may contribute to its pain-relieving effects.

Menstrual Cramp Relief: For individuals dealing with menstrual cramps, Valerian's muscle-relaxant properties may offer relief. Including Valerian in teas or herbal blends can help alleviate the discomfort associated with menstrual cramps.

Migraine Support: Valerian's calming effects on the nervous system can extend to migraine support. It may assist in reducing the frequency and severity of migraines by promoting relaxation and reducing stress, which are common triggers for migraines.

Digestive Health: Valerian's potential to relax muscles extends to the digestive system. It can help alleviate digestive discomfort by reducing muscle spasms and promoting a calmer digestive process. Valerian is sometimes included in herbal blends aimed at addressing indigestion and gastrointestinal discomfort.

Nervous System Support: Valerian's impact on the central nervous system can contribute to overall nervous system support. It may help reduce nervous tension and nervousness, promoting a sense of well-being and calm.

Restlessness and Hyperactivity: Valerian's calming effects make it a potential remedy for restlessness and hyperactivity, especially in children. It can be included in blends with other calming herbs to support focus and relaxation.

Creating Herbal Preparations for Various Uses:

Pain Relief Salve: Combine dried Valerian roots with a carrier oil such as olive or coconut oil to create a soothing salve. 

Gently warm the mixture and strain out the solids. Apply the infused oil to areas experiencing muscle pain or tension.

Menstrual Cramp Tea: Blend dried Valerian roots with herbs like ginger and cinnamon for a menstrual cramp-relieving tea. 

Steep a teaspoon of this blend in hot water for 10-15 minutes and sip during the menstrual cycle.

Migraine Tincture: Create a tincture by macerating dried Valerian roots in alcohol. 

A few drops of this tincture may be added to water or herbal teas as needed for migraine support.

Digestive Calming Blend: Combine Valerian with other digestive-friendly herbs like peppermint and fennel to create a tea that supports digestion. Steep a tablespoon of the blend in hot water for 10-15 minutes before meals.

Nervous System Tonic: Blend dried Valerian aerial parts with herbs like lemon balm and passionflower to create a nervous system-supporting tea. Steep a teaspoon of the blend in hot water and enjoy during moments of stress or nervousness.

By recognizing Valerian's broader medicinal potential, you can incorporate it into various preparations to address a range of health concerns. From pain relief to digestive support, Valerian's healing touch offers a holistic approach to well-being.

Conclusion: Embracing Valerian's Calming Embrace

Valerian (Valeriana officinalis) stands as a natural testament to serenity and well-being. From its historical use in herbal remedies to its versatility in various applications, Valerian's calming properties have transcended time. 

Its roots and aerial parts offer solace for sleeplessness, anxiety, pain, and more. By mastering the art of cultivation, harvesting, and preparation, we unlock the full potential of this soothing herb. 

Valerian's gentle touch, whether in garden beds, containers, or herbal teas, provides a tranquil haven in the midst of life's demands. As we welcome Valerian into our lives, we embrace its gift of calm, nurtured by nature itself.

How to Grow and Harvest Valerian Roots with Michael Pilarski "Skeeter"

Peppermint Growing Guide

The Beginner's Guide to Growing Peppermint: A Comprehensive Content Plan

Unveiling Peppermint: Nature's Refreshing Herb with Abundant Benefits

Step into the world of growing peppermint, a versatile herb that not only carries a delightful scent but also boasts a multitude of advantages for our well-being. 

This exploration invites us to dive into the essence of peppermint, uncovering its rich history and the array of benefits it offers in both culinary and medicinal realms.

Peppermint: A Breath of Freshness

Peppermint, scientifically known as Mentha × piperita, introduces us to a realm of invigorating fragrance and incredible versatility. Its cooling and revitalizing aroma make it a standout herb that tickles our senses and serves as a go-to ingredient in various applications.

Echoes of the Past: Historical Legacy and Healthful Perks

Throughout history, peppermint's virtues have echoed across cultures. In culinary realms, it has infused dishes with a unique flavor, while in the realm of health, it has been revered for its potential benefits. From aiding digestion to offering relief from headaches, peppermint's leaves have been employed to create soothing teas and potent remedies.

As we journey deeper, we'll uncover the culinary treasures and natural wellness potential that peppermint brings to our lives. Join us as we unravel the layers of this remarkable herb, from its historical significance to its modern-day roles as a fragrant companion and a wellness ally. 

Understanding Peppermint: Exploring a Perennial Herb with Invigorating Qualities

Peppermint (Mentha x piperita) is a perennial herb that beckons us into its world of invigorating aroma and multifaceted benefits. 

Let's delve into the essence of peppermint, understanding its characteristics, growth patterns, and the wellness it brings.

Peppermint's Perennial Presence:

Peppermint stands as a testament to nature's resilience, returning year after year as a perennial herb. Belonging to the mint family, Lamiaceae, peppermint boasts a vibrant lineage of minty cousins, each with its unique charm.

Characteristics and Growth Habits of Peppermint:

Known for its square stems, peppermint showcases deep green leaves that release a distinctive menthol fragrance when crushed. Its clusters of small purple flowers add an enchanting touch to its appearance. With a preference for moist and well-draining soil, peppermint thrives in areas that receive partial to full sunlight. 

Medicinal Marvels of Peppermint:

Peppermint's medicinal properties are just as captivating as its scent. Its essential oils, including menthol, lend themselves to an array of benefits. Peppermint tea is revered for its soothing effects on digestion, offering relief from bloating and discomfort. Additionally, the menthol in peppermint serves as a natural decongestant, making it a favorite in cold remedies.

Invigoration and Digestive Delight of Peppermint:

The invigorating essence of peppermint extends beyond its aroma. A cup of freshly brewed peppermint tea can offer a refreshing pick-me-up, revitalizing both mind and body. Furthermore, peppermint's potential to ease digestive woes is renowned, making it a trusted ally after hearty meals.

Peppermint's role as a perennial herb not only graces our gardens but also invigorates our senses and wellness. From its unmistakable aroma to its beneficial properties, peppermint presents a fascinating tapestry of nature's gifts. 

Selecting the Right Growing Conditions for Thriving Peppermint

Peppermint (Mentha x piperita) flourishes in an environment that mirrors its natural habitat. 

Let's delve into the optimal conditions that pave the way for successful peppermint cultivation.

Embracing the Ideal Climate of Peppermint:

Peppermint thrives in temperate climates, favoring regions with cooler temperatures. While it can tolerate varying conditions, it truly thrives in areas with moderate summers and mild winters.

Sunlight, Soil, and Moisture of Peppermint:

Sunlight is peppermint's partner in vitality. It craves bright but indirect sunlight, making a partially shaded location a perfect match. When it comes to soil, opt for well-draining, loamy soil that retains moisture without becoming waterlogged. Ample moisture is essential, but avoid waterlogged conditions that can lead to root rot.

The Right Location of Peppermint:

Select a planting location that receives morning sun and afternoon shade. This mimics the conditions of its native woodlands. If planting in a garden bed, provide enough space between plants to ensure proper airflow and prevent overcrowding.

Preparing the Soil of Peppermint:

Before planting peppermint, enrich the soil with organic matter like compost to improve drainage and fertility. If growing in containers, choose a pot with drainage holes and a high-quality potting mix.

Moisture Maintenance of Peppermint:

Peppermint's love for moisture extends to its roots. Regular watering is vital, especially during dry spells. Applying a layer of mulch around the base of the plants helps retain moisture, regulate soil temperature, and suppress weed growth.

Container Cultivation of Peppermint:

For those with limited garden space, growing peppermint in containers is a splendid option. Choose a container with ample drainage holes, and fill it with well-draining potting mix. Containers can be placed strategically to provide the necessary light and shade conditions.

Peppermint's well-being is intricately tied to the right growing conditions. By embracing its preference for temperate climates, ensuring adequate sunlight, choosing the right soil, and maintaining moisture levels, you set the stage for a thriving peppermint garden. 

Whether you're planting in garden beds or containers, adhering to these guidelines ensures that peppermint's invigorating essence and versatile benefits flourish in your garden. 

Propagation and Planting: Nurturing Peppermint Through Divisions and Cuttings

Peppermint (Mentha x piperita) offers a world of aromatic wonder, and propagating it to expand your garden is an exciting journey. 

Let's explore the art of propagating peppermint through divisions and cuttings, and learn how to plant them for vibrant growth.

Propagation Methods of Peppermint:

Divisions: Dividing established peppermint plants is a straightforward method. It's best done in early spring when new growth emerges. Gently dig up the plant and separate it into smaller clumps, ensuring each division has roots and healthy foliage.

Cuttings: Taking cuttings is a fantastic way to create new peppermint plants. Snip 3 to 4-inch stem cuttings from healthy plants during the growing season. Remove the lower leaves, leaving a few at the top, and root the cuttings in water or well-draining soil.

Dividing Peppermint Plants:

a. Choose a healthy peppermint plant with robust growth.

b. Gently dig up the entire plant using a garden fork or shovel.

c. Carefully separate the plant into smaller sections, ensuring each division has roots and shoots.

d. Replant the divisions in well-draining soil at the same depth as they were previously.

Taking Cuttings of peppermint:

a. Select healthy stems for cuttings, preferably without flowers.

b. Cut just below a leaf node and remove the lower leaves.

c. Dip the cut end in rooting hormone (optional) and plant it in well-draining soil or water.

d. Place the container in a bright, indirect light spot and keep the soil consistently moist.

Proper Spacing and Planting of peppermint:

a. Whether planting divisions or cuttings, space them about 18 to 24 inches apart. This provides ample room for growth and proper airflow.

b. Plant them at the same level as they were in their previous container or garden bed.

c. Press the soil gently around the plant to ensure good soil-to-root contact.

By embracing the art of propagation and planting, you not only expand your peppermint garden but also deepen your connection with this aromatic herb. 

Dividing and taking cuttings enable you to share the gift of peppermint's fragrance and potential benefits with new corners of your garden. With proper spacing and planting techniques, your peppermint plants will thrive, and their invigorating essence will grace your outdoor space. 

Watering and Maintenance: Nurturing Peppermint's Refreshing Aroma and Health

Peppermint (Mentha x piperita) thrives in an environment that echoes its natural habitat's moisture. 

Let's explore the art of watering and maintaining peppermint to ensure its vibrant growth and aromatic potency.

Watering Needs of Peppermint:

Consistent moisture is a key to peppermint's well-being. It's essential to keep the soil evenly moist, as this mimics the damp conditions it loves in the wild.

Watering Frequency and Avoiding Overwatering:

Water your peppermint plants deeply but infrequently. Aim for watering every 4 to 5 days, or when the top inch of soil feels slightly dry. Overwatering can lead to root rot, so always ensure that the soil has proper drainage.

Mulching for Moisture Retention:

Applying a layer of organic mulch, like straw or wood chips, around your peppermint plants helps retain soil moisture, prevent weed growth, and maintain even temperatures. Mulching is especially beneficial during dry spells.

General Care and Maintenance:

Pruning: Regular pruning is essential for peppermint's vitality. Trim back leggy stems and spent flowers to encourage new growth. This also helps maintain the plant's shape and prevents overcrowding.

Preventing Invasive Spread: Peppermint has a vigorous growth habit and can spread quickly. To prevent it from becoming invasive, consider planting it in containers or confining it to a designated area in your garden.

Fertilization: Peppermint doesn't demand heavy feeding. A light application of balanced fertilizer in spring can support its growth. Avoid excessive nitrogen, as it may lead to excessive foliage growth.

Pest Control: Peppermint is relatively resistant to pests, but it's still wise to monitor for aphids, spider mites, or other common pests. Natural remedies like neem oil or insecticidal soap can help keep infestations at bay.

Winter Care: In colder climates, peppermint may die back in winter. Mulch around the base of the plant to protect its roots from freezing temperatures.

As you embark on the journey of watering and maintaining peppermint, remember that its lush foliage and invigorating aroma are reflections of your care. 

Providing consistent moisture, avoiding overwatering, and implementing proper care practices ensure a thriving peppermint garden that graces your senses and enhances your well-being. 

With each pruning and nurturing touch, you'll be rewarded with the vibrant presence of this remarkable herb. Happy peppermint nurturing!

Harvesting and Utilizing Peppermint: Capturing Nature's Invigorating Essence

Peppermint (Mentha x piperita) gifts us with its invigorating aroma and multifaceted uses. 

Discover the art of harvesting, drying, and harnessing its potential in culinary, beverage, and wellness realms.

Optimal Timing and Techniques for Harvesting:

Peppermint's flavorful leaves are at their best just before the plant flowers. Harvest in the morning when the essential oils are most concentrated. Gently snip individual stems or cut branches near the base, allowing new growth to flourish.

Drying and Storing Peppermint:

Air Drying: Bundle harvested stems and hang them upside down in a dry, well-ventilated area. Once dry, store the leaves in airtight containers away from light and humidity.

Oven Drying: Lay leaves on a baking sheet and set the oven to the lowest temperature (around 100 to 110°F or 38 to 43°C). Check frequently until leaves are crisp.

Microwave Drying: Place leaves between paper towels and microwave on low in 20-second intervals until dry.

Storing: Preserve peppermint's freshness by storing dried leaves in airtight containers away from direct light and moisture.

Culinary Delights, Teas, and Natural Remedies:

Culinary Applications: Peppermint adds a refreshing twist to both sweet and savory dishes. From desserts to salads, its minty zing elevates culinary creations.

Invigorating Teas: Steep dried peppermint leaves in hot water to create a soothing and rejuvenating herbal tea. Its aroma and potential digestion-soothing benefits make it a popular choice.

Natural Remedies: Peppermint's menthol offers relief from headaches, congestion, and muscle discomfort. A diluted peppermint oil massage or steam inhalation can ease tension and clear airways.

By harvesting at the right time, mastering drying techniques, and delving into diverse uses, you unlock the aromatic treasure of peppermint. 

Its culinary magic, refreshing teas, and potential wellness benefits await your creative touch. With each cup of tea and culinary creation, you'll experience the captivating essence of peppermint that enriches both palate and well-being.

Exploring Peppermint Varieties: A Fragrant Journey into the World of Minty Diversity

Peppermint (Mentha x piperita) beckons us with its enchanting aroma and myriad benefits. 

As we step into the realm of peppermint varieties, we embark on an aromatic journey where flavors, scents, and growth habits intertwine to create a tapestry of minty delights.

Peppermint: A Symphony of Varieties

Peppermint's world of diversity unfolds through its various cultivars, each carrying distinct attributes that make it a standout in the herb garden. From aromatic allure to culinary versatility, these varieties showcase the art of nature's customization.

Highlighting Unique Characteristics:

Chocolate Peppermint (Mentha x piperita 'Chocolate'): This variety boasts leaves with a hint of chocolatey aroma, adding a unique twist to the classic peppermint fragrance.

Orange Mint (Mentha x piperita 'Citrata'): A refreshing citrus undertone sets this variety apart, infusing its leaves with a zesty and invigorating scent.

Ginger Mint (Mentha x piperita 'Ginger'): The warming essence of ginger adds a spicy note to this variety's minty base, making it an intriguing addition to herbal concoctions.

Variations in Flavor, Aroma, and Growth Habits:

Each peppermint cultivar carries its own personality, reflected in its flavor, aroma, and growth patterns. While classic peppermint offers a balanced minty taste, variations like chocolate peppermint add a touch of decadence. The growth habits vary as well; some cultivars spread vigorously, while others are more compact.

Recommendations for Beginners:

For those new to the world of peppermint, classic peppermint (Mentha x piperita) and spearmint (Mentha spicata) are wonderful starting points. Classic peppermint's balanced flavor and aroma make it an all-time favorite for culinary and tea applications. 

Spearmint's gentle mintiness and less invasive growth habit also make it beginner-friendly.

As you venture into the enchanting realm of peppermint varieties, consider the flavors and scents that resonate with you. Whether you're drawn to the subtle warmth of ginger mint or the playful twist of chocolate peppermint, each variety offers a unique journey into the art of minty diversity. 

By selecting beginner-friendly options like classic peppermint and spearmint, you set the stage for a delightful exploration that adds fragrance and flavor to your garden and culinary creations. Embrace the aromatic adventure and let peppermint's diverse cultivars elevate your gardening experience!

Thyme Growing Guide

Beginner's Guide to Growing Thyme: A Comprehensive Content Plan

Welcome to the enchanting world of thyme – a versatile and aromatic herb that has captured the hearts of culinary enthusiasts and healers alike. 

In this post, we are going to discuss Beginner's Guide to Growing Thyme, the fascinating qualities of thyme and uncover its abundant culinary and medicinal wonders. 

Understanding Thyme: A Versatile Perennial Herb with Culinary and Medicinal Magic

Overview of Thyme (Thymus vulgaris): 

Thyme, scientifically known as Thymus vulgaris, is a remarkable perennial herb cherished for its aromatic allure and multifaceted nature. This small evergreen plant belongs to the mint family, Lamiaceae, and boasts a myriad of culinary and medicinal applications. 

With its delicate leaves, charming flowers, and enchanting fragrance, thyme has secured its place as a garden favorite and a cherished ingredient in kitchens worldwide.

Characteristics and Growth Habits of Thyme:

Thyme presents itself as a compact and bushy herb, typically reaching a height of 6 to 12 inches. Its oval-shaped leaves are adorned with tiny hairs that contribute to its distinct texture and fragrance. The plant blooms with petite lilac, pink, or white flowers that add a touch of elegance to its appearance.

Thyme thrives in sunny locations and prefers well-draining soil, making it a resilient addition to various garden landscapes. Its adaptability allows it to grow successfully in both garden beds and containers, making it a popular choice for herb gardening enthusiasts.

Medicinal Properties of Thyme:

Beyond its ornamental charm and culinary appeal, thyme is celebrated for its healing properties. The essential oils found in thyme leaves contain compounds like thymol, which possess potent antimicrobial and antiseptic properties. 

These attributes have long been valued in traditional medicine, where thyme has been utilized to treat respiratory issues like coughs, bronchitis, and congestion. Additionally, thyme is considered to aid digestion and alleviate gastrointestinal discomfort.

Culinary Versatility of Thyme:

Thyme's versatility in the kitchen is nothing short of extraordinary. Its earthy and slightly minty flavor complements an array of dishes, from savory roasts and stews to flavorful sauces and marinades. Popular in Mediterranean, Middle Eastern, and European cuisines, thyme elevates the taste of countless recipes, making it a go-to herb for culinary enthusiasts.

Health Benefits of Thyme:

Aside from its delicious taste, thyme packs a nutritional punch. Rich in antioxidants, vitamins, and minerals, this herb supports overall health and well-being. Thyme is known for its immune-boosting properties, promoting healthy skin, and aiding in digestion. Furthermore, recent studies have highlighted its potential anti-inflammatory effects and the role it may play in managing oxidative stress.

Thyme is a versatile perennial herb that enchants us with its delightful fragrance, culinary delights, and healing wonders. From gardens to kitchens, this aromatic gem shines brightly, offering a wealth of culinary and medicinal benefits. 

As we deepen our understanding of thyme's magic, let us celebrate its role in enhancing both our palates and our well-being. Embrace thyme's culinary and medicinal versatility and unlock its full potential in your garden, kitchen, and health pursuits. 

Selecting the Right Growing Conditions for Thyme: A Recipe for Thriving Herbs

When it comes to growing thyme (Thymus vulgaris) successfully, providing the ideal climate and environmental conditions is essential. 

This versatile herb thrives in certain settings that mimic its native Mediterranean habitat. 

Here's a guide to creating the perfect environment for your thyme to flourish.

Embracing the Mediterranean Climate:

Thyme hails from the Mediterranean region, where it basks in warm, sunny weather with mild winters. To replicate its natural habitat, choose a location with a Mediterranean-like climate. This means providing your thyme with plenty of sunshine and temperatures that range between 60 to 75°F (15 to 24°C) during the growing season.

The Sunlit Secret to Success:

Sunlight is the lifeblood of thyme, and it craves at least 6 to 8 hours of direct sunlight daily. Choose a spot in your garden that receives ample sunlight, preferably facing south or west. Without sufficient sunlight, thyme's growth may be stunted, and its aromatic oils, which give it flavor, might not develop to their full potential.

Soil Type and Drainage Matters:

Thyme prefers well-draining soil, so opt for sandy or loamy soil types to ensure proper drainage. Soil that holds too much water can lead to root rot and hinder thyme's growth. If your soil is heavy or clay-based, consider amending it with organic matter like compost or peat moss to improve drainage.

Location, Location, Location:

When selecting a location for your thyme, keep in mind that it doesn't like to be overshadowed by other plants. Give it enough space to spread its branches and receive ample sunlight. You can plant thyme in garden beds, raised planters, or even containers, making it a great choice for small gardens or urban spaces.

Preparing the Perfect Bed:

Before planting thyme, ensure the soil is loose, well-draining, and rich in organic matter. Remove any weeds or rocks that might interfere with its growth. If you're growing thyme in a container, use a high-quality potting mix with excellent drainage.

Providing the right growing conditions for thyme sets the stage for a thriving herb garden. Embrace the Mediterranean climate, bask your thyme in sunlight, and offer it well-draining soil. 

By selecting the perfect location and preparing the soil diligently, you'll create an environment where your thyme can flourish and delight your senses. With these tips, you're ready to embark on a successful thyme-growing adventure in your garden. 

Propagation and Planting: Nurturing Thyme from Seeds, Cuttings, and Divisions

Thyme (Thymus vulgaris) offers multiple avenues for propagation, allowing gardeners to expand their herb gardens through seeds, cuttings, and divisions. 

Each method has its own charm and effectiveness, offering a rewarding journey in growing thyme.

Propagation Methods:

a. Seeds: Propagating thyme from seeds is an economical and adventurous option. Thyme seeds are tiny, so starting them indoors in late winter or early spring is recommended. 

You can also sow them directly in the garden after the last frost. While growing from seeds takes longer, it provides a deeper connection to the plant's growth journey.

b. Cuttings: Taking cuttings is an efficient way to propagate thyme, preserving the characteristics of the parent plant. Snip 3 to 4-inch stem cuttings from the tips of healthy thyme plants during the growing season. Root the cuttings in well-draining soil or water, and within a few weeks, you'll have new thyme plants to transplant.

c. Divisions: Dividing mature thyme plants is ideal for rejuvenating older specimens and creating new plants. In early spring, gently dig up the plant and separate it into smaller clumps, ensuring each division has roots and healthy foliage. Transplant the divisions to their new locations.

Sowing Thyme Seeds:

a. Fill a seed tray or small pots with a well-draining seed-starting mix.

b. Scatter thyme seeds on the surface and lightly press them into the soil.

c. Mist the soil with water and cover the tray with plastic wrap or a transparent lid to create a mini-greenhouse effect.

d. Place the tray in a warm spot with indirect sunlight.

e. Once the seeds germinate and seedlings emerge, remove the cover and gradually acclimate them to direct sunlight.

Taking Thyme Cuttings:

a. Select healthy, non-flowering stems for cuttings.

b. Cut just below a leaf node and remove the lower leaves, leaving a few at the top.

c. Dip the cut end in rooting hormone (optional) and insert it into a container with well-draining soil or water.

d. Place the container in a warm, well-lit area, ensuring the cuttings stay moist.

Dividing Thyme Plants:

a. Gently dig up the mature thyme plant using a garden fork or shovel.

b. Divide the plant into smaller clumps, ensuring each division has roots and healthy foliage.

c. Transplant the divisions into their new locations with well-draining soil.

Spacing and Planting Techniques for Thyme:

a. For garden beds, space thyme plants 12 to 18 inches apart to allow for proper air circulation.

b. In containers, give each plant enough room to grow and expand its roots.

c. Plant thyme at the same level as it was in its previous container or garden bed.

Propagating and planting thyme through seeds, cuttings, and divisions offers a delightful journey in herb gardening. Whether you choose the excitement of growing from seeds, the efficiency of taking cuttings, or the rejuvenation of divisions, each method rewards you with new thyme plants to enjoy. With proper spacing and planting techniques, you'll ensure healthy growth and thriving thyme in your garden or containers. 

Watering and Maintenance: Nurturing Thyme with Moderate Moisture and Tender Care

Watering Needs of Thyme:

Thyme thrives in well-draining soil, emphasizing the importance of moderate moisture. 

While it requires consistent watering, overwatering can lead to root rot and other issues. Striking the right balance is key to keeping thyme healthy and happy.

Watering Frequency for Thyme:

Water thyme plants deeply but infrequently. Aim to water them once every 7 to 10 days, or when the top inch of soil feels dry to the touch. Thyme's deep roots allow it to withstand short periods of drought, making it a resilient herb.

Avoiding Overwatering of Thyme:

Excess moisture is thyme's enemy, so be cautious not to overwater. Always allow the soil to dry out between waterings, as soggy conditions can harm the roots and promote fungal growth. When in doubt, it's better to water less frequently than too often.

Mulching for Moisture Retention:

Applying a layer of organic mulch, such as straw or bark, around thyme plants helps retain moisture and suppress weed growth. Mulching also regulates soil temperature, protecting the plant from extreme fluctuations.

General Care and Maintenance of Thyme:

Pruning: Regular pruning is essential for maintaining thyme's compact and bushy form. Trim the plant back after flowering or whenever it becomes leggy. This encourages fresh growth and enhances its appearance.

Fertilization: Thyme doesn't demand heavy feeding, but a light application of balanced fertilizer in spring can boost its growth. Avoid excessive nitrogen, as it may lead to excessive foliage growth at the expense of essential oils.

Pest Control: Thyme is relatively resistant to pests and diseases. However, keeping an eye out for aphids or spider mites and addressing them promptly with natural solutions like neem oil or insecticidal soap is wise.

Winter Care: In colder climates, protect thyme from harsh winter conditions by providing a layer of mulch around the base of the plant. If grown in containers, consider moving them indoors or to a sheltered location during extreme cold spells.

Watering and maintenance play a vital role in nurturing thyme to its fullest potential. Strive for moderate moisture, allowing the soil to dry between waterings to avoid overwatering. Mulching helps retain moisture and ensures a healthy root system. Additionally, practice proper care and maintenance, including pruning, light fertilization, and pest control, to keep thyme flourishing throughout the growing season. With tender care and attention, your thyme garden will be a thriving oasis of aroma and flavor. 

Harvesting and Utilizing Thyme: Capturing the Aromatic Magic in Your Culinary Creations

Timing the Harvest of Thyme:

Thyme is at its flavor peak just before it starts to bloom. 

The optimal time to harvest thyme leaves is in the morning when the dew has evaporated but before the sun becomes too strong.

This ensures the highest concentration of essential oils, which contribute to thyme's delightful aroma and taste.

Techniques for Harvesting Thyme:

To harvest thyme leaves, use a pair of sharp scissors or pruning shears to snip the stems just above a leaf node. This encourages new growth and ensures the plant remains healthy. Avoid taking too many leaves from a single plant, as it may hinder its ability to recover and thrive.

Drying and Storing Thyme:

Air Drying: The traditional method of drying thyme involves bundling several stems together and hanging them upside down in a warm, well-ventilated area. Ensure that the leaves are not crowded, allowing for proper airflow. Once dry, crumble the leaves and store them in an airtight container away from direct sunlight.

Oven Drying: For a faster option, you can dry thyme leaves in the oven. Lay the leaves in a single layer on a baking sheet lined with parchment paper and set the oven to the lowest temperature (around 100 to 110°F or 38 to 43°C). Check the leaves every 30 minutes until they are dry and crumbly.

Microwave Drying: Microwaving thyme leaves is a quick method. Spread a single layer of leaves between two paper towels and microwave them on high for 1 to 2 minutes. Check the leaves for dryness and repeat if necessary.

Storing: Store dried thyme leaves in airtight containers, away from heat and light. Properly dried and stored thyme can retain its flavor and aroma for up to six months.

Culinary Applications of Thyme:

Flavor Enhancer: Thyme is a versatile herb that complements various dishes. 

Add it to meat marinades, soups, stews, and roasted vegetables to enhance their flavor profiles.

Herb Butter: Combine softened butter with chopped thyme leaves, salt, and pepper to create a delightful herb butter. 

Spread it on bread, melt it over steamed vegetables, or use it to baste meats.

Infused Oils and Vinegars: Create infused oils and vinegars by steeping thyme sprigs in the liquid of your choice. These infusions add a burst of thyme's aroma and taste to dressings, marinades, and dips.

Seasoning Salt: Make your own thyme-infused seasoning salt by mixing dried thyme leaves with coarse sea salt. This seasoning can elevate the flavors of your dishes with a sprinkle.

Herbal Teas: Thyme leaves can be used to make flavorful herbal teas. Steep fresh or dried leaves in hot water for a soothing and aromatic beverage.

Herbed Salt and Sugar Blends: Mix dried thyme leaves with salt or sugar to create unique and aromatic blends that add a twist to sweet or savory recipes.

Harvesting and utilizing thyme is a rewarding journey that brings the aromatic magic of this herb to your culinary creations. Timing the harvest and using proper techniques for drying and storing thyme leaves ensures the best flavor retention. Once dried and ready, thyme can be employed in various culinary applications, from seasoning dishes to infusing oils and vinegars. So, get ready to unlock the potential of thyme and let its delightful aroma and taste elevate your cooking to new heights. 

Exploring Thyme Varieties: A Journey into the Diverse World of Aromatic Herbs

Thyme (Thymus vulgaris) offers a diverse range of varieties, each with its own unique characteristics that make it a delightful addition to any herb garden. From distinct flavors and aromas to varying growth habits, thyme cultivars present a world of possibilities for culinary and ornamental purposes.

Lemon Thyme (Thymus x citriodorus):

Lemon thyme is celebrated for its zesty lemon fragrance, which sets it apart from other varieties. 

Its small, variegated leaves add a pop of color to the garden, making it an attractive ornamental plant. 

Lemon thyme's bright flavor complements fish, poultry, and vegetable dishes, adding a citrusy twist.

French Thyme (Thymus vulgaris 'French'):

As a staple in French cuisine, French thyme boasts a robust and earthy flavor that pairs perfectly with classic dishes like bouillabaisse and coq au vin. 

Its dense growth habit makes it an excellent ground cover, making it both flavorful and visually appealing.


English Thyme (Thymus vulgaris 'English'):

English thyme is one of the most commonly used thyme varieties. It features a balanced flavor profile, combining elements of sweetness and pungency. 

This classic thyme is perfect for seasoning meats, soups, and sauces.


Creeping Thyme (Thymus serpyllum):

Creeping thyme is known for its low-growing and spreading habit, making it ideal for ground cover or as an edging plant. 

Its delicate leaves release a pleasant fragrance when stepped on, making it a delightful addition to pathways or between stepping stones.

Woolly Thyme (Thymus pseudolanuginosus):

Woolly thyme's unique feature is its soft, silvery-gray foliage, which adds an intriguing texture to the garden. 

This low-maintenance variety is drought-tolerant and suitable for rock gardens or slopes.

Caraway Thyme (Thymus herba-barona):

Caraway thyme surprises with a distinctive aroma reminiscent of caraway seeds, giving it a unique flavor profile. 

It enhances the taste of bread, cheese, and lamb dishes, making it a standout choice for culinary experiments.

Archer's Gold Thyme (Thymus citriodorus 'Archers Gold'):

Archer's Gold thyme showcases striking golden-yellow foliage, adding a splash of color to any landscape. 

Its lemony scent and flavor make it a splendid choice for tea blends, desserts, and roasted vegetables.


Thyme Recommendations for Beginners:

For those new to growing thyme, English thyme (Thymus vulgaris 'English') and Lemon thyme (Thymus x citriodorus) are excellent choices. English thyme is easy to grow, versatile in the kitchen, and has a well-rounded flavor. 

Lemon thyme adds a refreshing twist to dishes and is just as simple to cultivate. Both varieties are forgiving and adapt well to various growing conditions.

Exploring thyme varieties opens up a world of delightful possibilities for your garden and culinary creations. Each cultivar brings its own unique characteristics, from diverse flavors and aromas to different growth habits. 

Whether you're seeking classic thyme for traditional recipes or adventurous variations for innovative dishes, the thyme family offers something for every gardener and chef to savor. 

Consider starting with beginner-friendly varieties like English thyme and Lemon thyme, and let your herb garden flourish with aromatic diversity. 

Video brought to you by Tanya Visser - The Gardener

Calendula growing guide

The Beginner's Guide to Growing Calendula: A Comprehensive Content Plan The Complete Calendula Growing Guide: Tips for Vibrant Blooms In...